Telegram Proxy
Overview
A Telegram proxy server is an intermediary server through which the Telegram app connects to Telegram's servers. It can help you use Telegram when a direct connection is unavailable or restricted. The proxy is added in Telegram's settings and is used only by that app.
AmneziaVPN 5.0.0.5 and later lets you install a Telegram proxy service on your own server and manage it through the app:
- MTProxy — Telegram's official implementation of an MTProto proxy server.
- Telemt — an alternative MTProto proxy implementation with additional built-in traffic obfuscation mechanisms designed to bypass network blocking.
- TProxy (Telegram WEB) — a WEB proxy for Telegram. Available in AmneziaVPN 5.0.2.1 and later.
MTProxy and Telemt
Whether MTProxy and Telemt work depends on the region from which you connect, your ISP and its network restrictions, and your server's IP address. For this reason, we cannot recommend settings that guarantee a proxy connection on every network.
AmneziaVPN only installs the proxy services on your server and lets you manage them.
Installing MTProxy and Telemt on Your Server
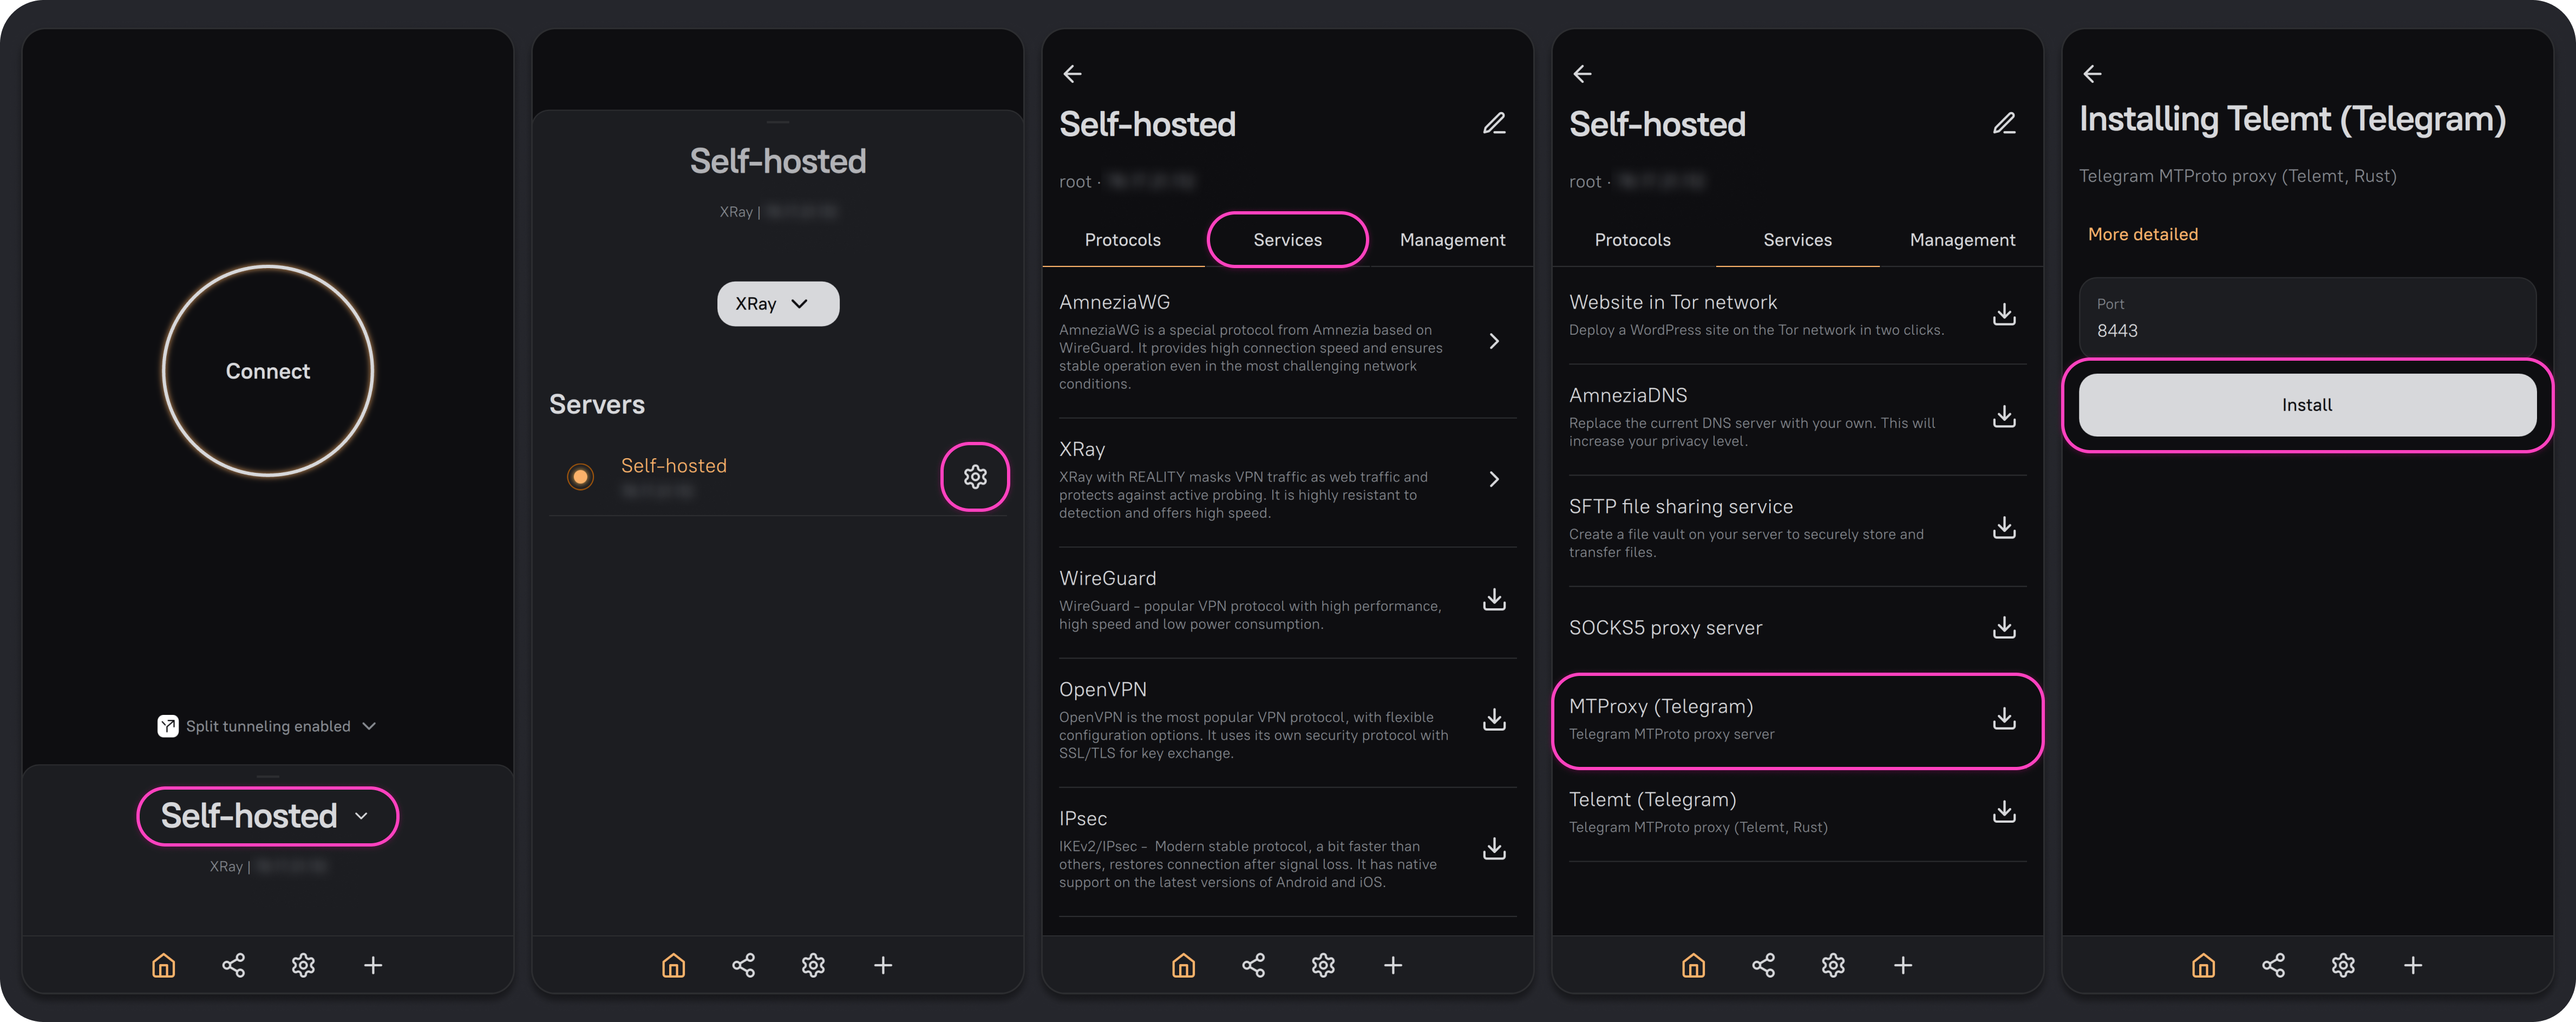
- On the AmneziaVPN main screen, click any connection name.
- Click ⚙️ (gear icon) to the right of the server.
- Open the Services tab.
- Select MTProxy or Telemt. If necessary, specify a port that is not already in use on the server, then click Install.
You can install both proxy services on the same server, but they must use different ports. If XRay or OpenVPN over TCP is already installed on the server, do not use its port for the proxy.
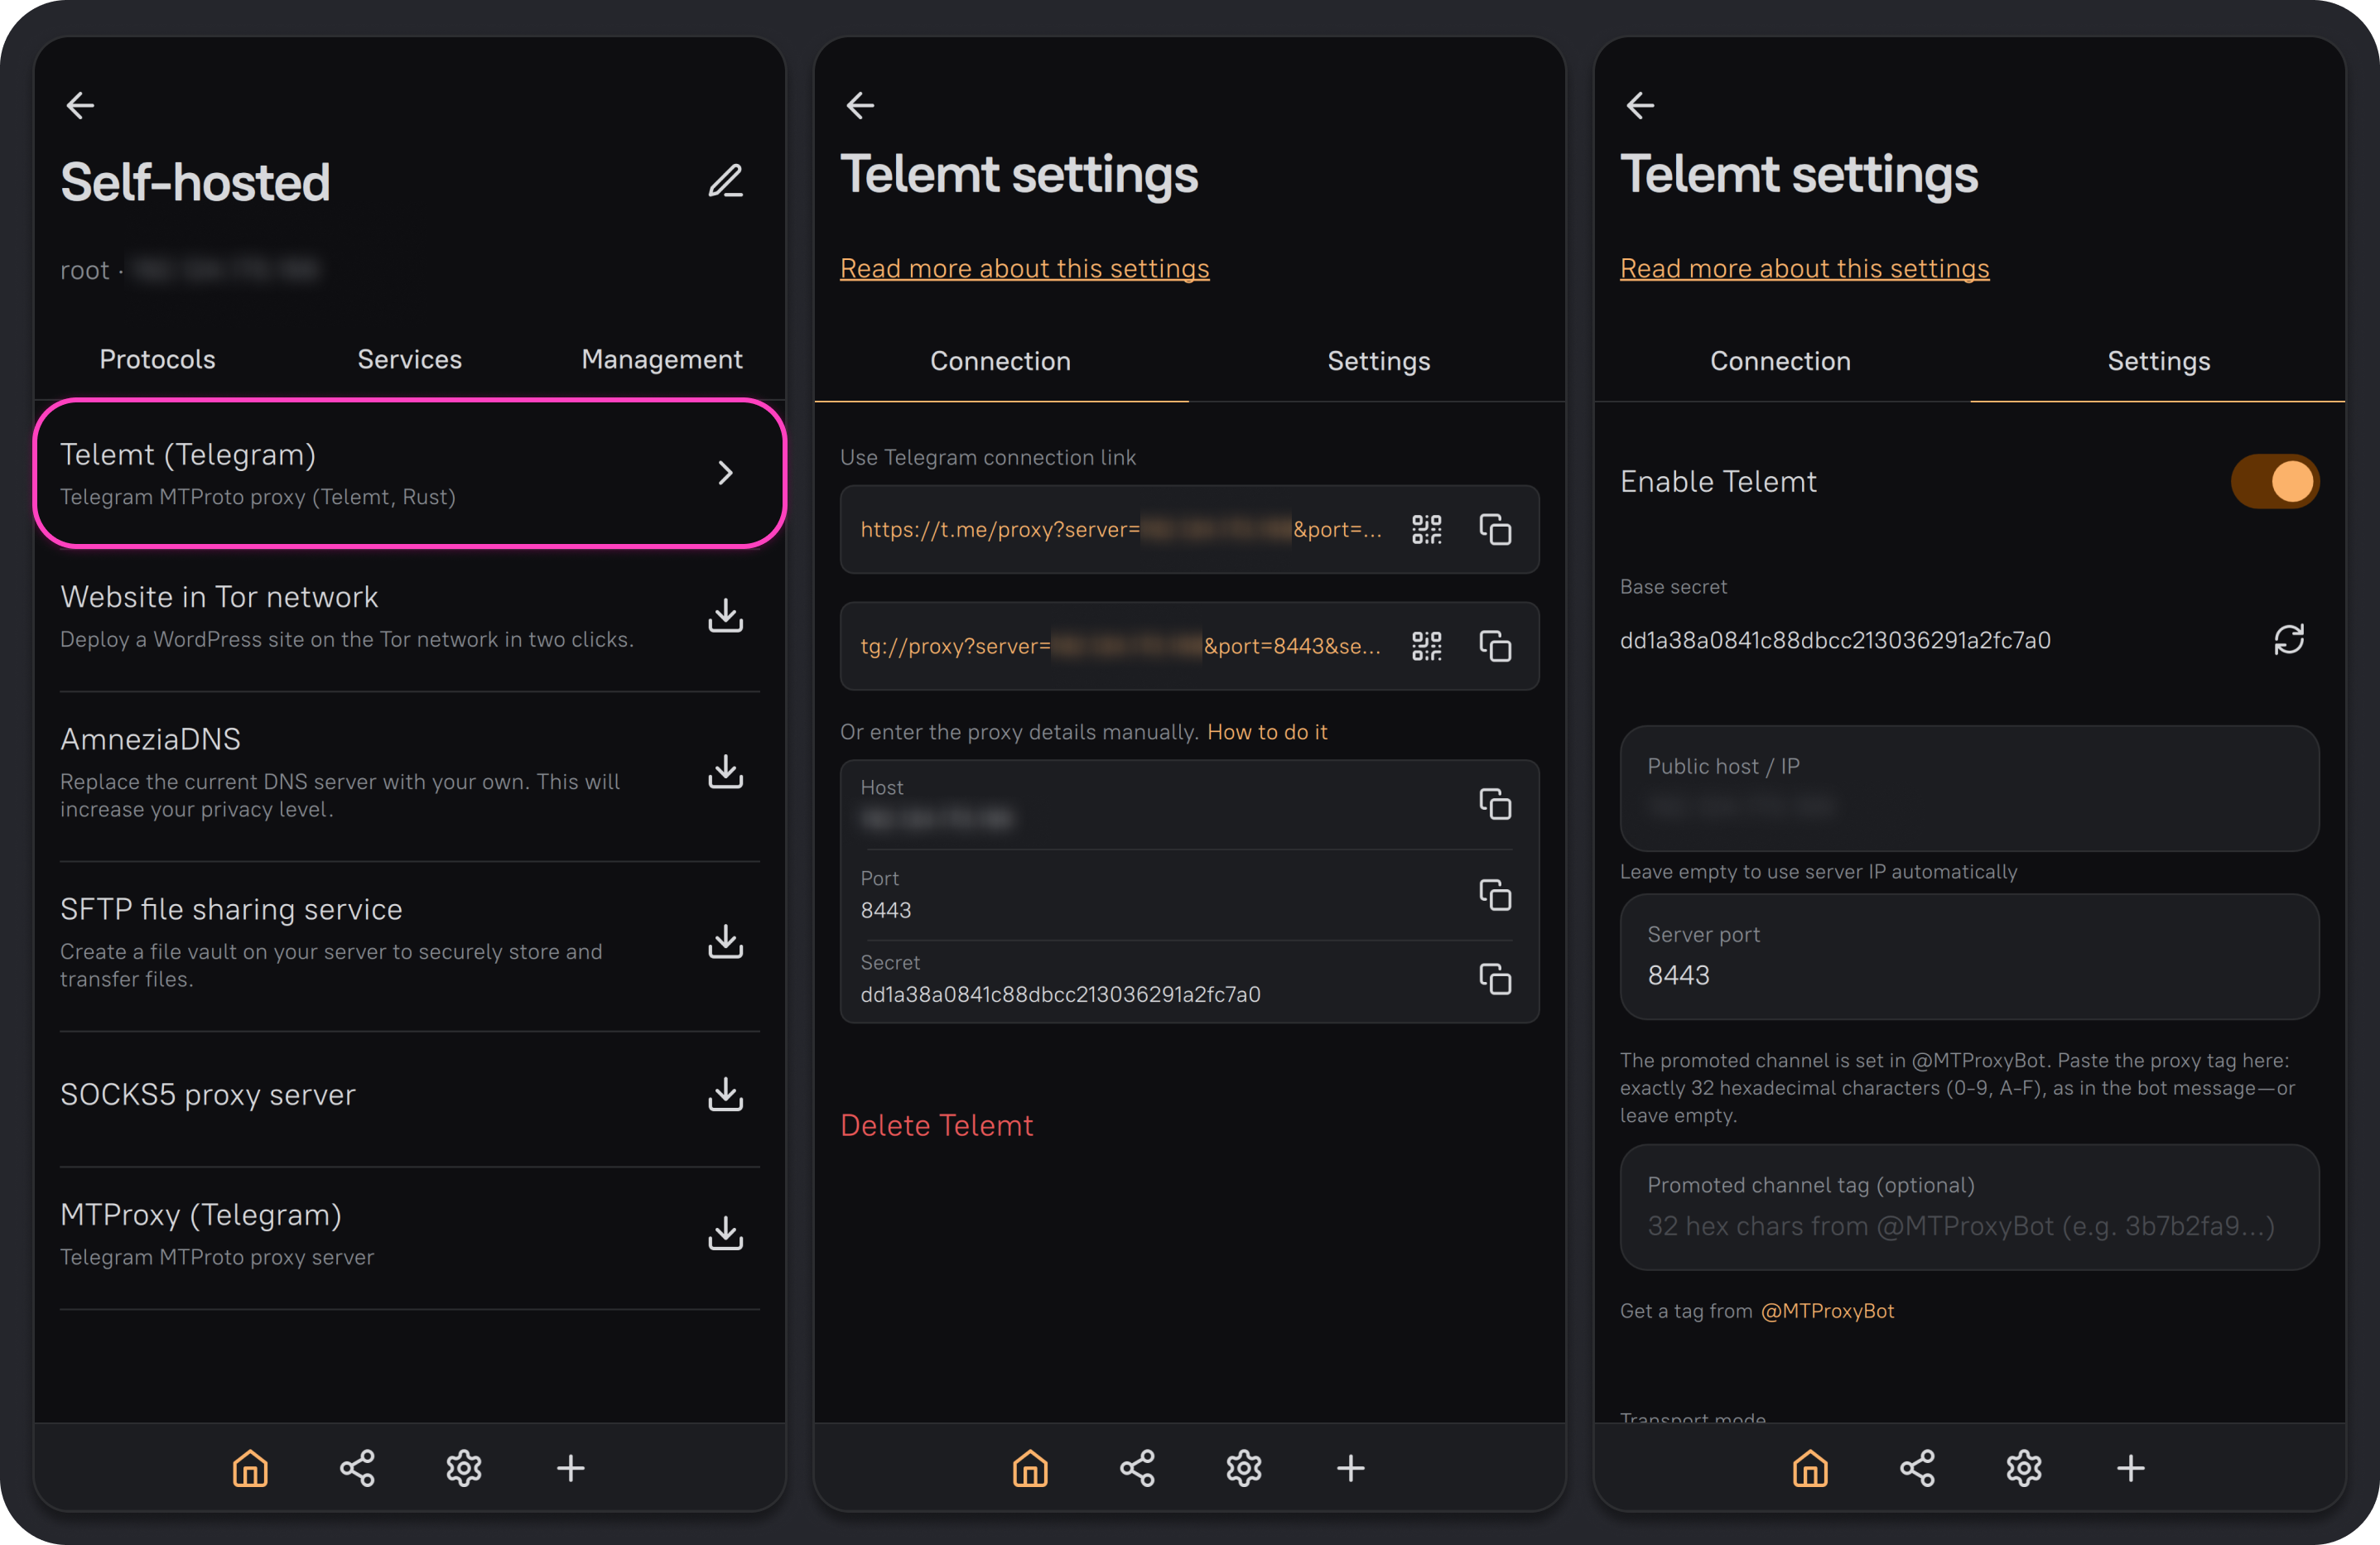
After installation, AmneziaVPN takes you back to the Services tab. Select the installed MTProxy or Telemt service to open its details: connection information is available on the Connection tab, while proxy settings are on the Settings tab.
Connecting Through MTProxy or Telemt in Telegram
The Connection tab contains two connection links and their QR codes, as well as the server address, port, and secret for manual setup.
For automatic setup, click the copy icon to the right of a proxy link and send it to Saved Messages or another Telegram user. Open the link in the chat and confirm adding the proxy server.
For manual setup, open the proxy settings in Telegram, select MTProto, and enter the proxy details from the Connection tab in AmneziaVPN. Save the connection settings and enable the proxy.
MTProxy and Telemt Settings
To open the proxy settings, go to the Services tab in the server settings, select MTProxy or Telemt, then open the Settings tab. Additional settings are available under Advanced on the same tab.
| Setting | Description |
|---|---|
| Enable MTProxy / Enable Telemt | Turns the service on or off. You cannot connect to the proxy while the service is disabled |
| Base secret | The primary secret, generated automatically. Click the refresh icon to generate a new random value |
| Public host / IP | The address added to connection links. Leave this field empty to use the address of the server where the proxy is installed |
| Server port | The TCP port used by the proxy. The default is 443 |
| Promoted channel tag | An optional 32-character tag issued by @MTProxyBot after you register the proxy. It provides access to statistics and lets you assign a promoted channel |
| Transport mode | The connection obfuscation method: Standard MTProto uses random packet padding, while FakeTLS disguises the connection as TLS traffic |
| Additional secrets | Additional secrets with their own proxy connection links, created by clicking Add additional secret. They can make access management easier: remove a secret at any time to prevent connections that use it |
| Worker mode | Controls the number of separate MTProxy processes that handle connections. Leave it set to Auto for a standard installation. Manual is useful only under high load on a multi-core server: there is no universal value, so increase the number gradually while monitoring the server load and proxy performance. In FakeTLS mode, the value is set to 0 and cannot be changed |
| Server is behind NAT / Docker bridge | Lets you specify the proxy's internal and external IP addresses manually. Leave this setting off when the proxy is installed on a VPS with a public IP address |
In AmneziaVPN 5.0.0.5, Worker mode and Server is behind NAT / Docker bridge appear in the Telemt settings, but changing them does not affect the service configuration on the server. This issue will be fixed in the next AmneziaVPN release.
Change these settings only when you need to change the port, enable FakeTLS, create an additional secret, or follow a specific configuration recommendation. If the proxy works, keep the settings applied during installation.
If port 443 is already in use by XRay or another TCP service, choose an available port, such as 8443 or 4515. These are examples only and do not guarantee that the proxy will be reachable from a particular network. FakeTLS may not work correctly if the proxy service uses a port other than 443.
AmneziaWG can use the same port number as the proxy because AmneziaWG uses UDP, while MTProxy and Telemt use TCP.
After changing Base secret, Server port, Transport mode, or FakeTLS domain, use the new connection link. The previous link and any proxy connections configured with it will stop working.
FakeTLS Mode
- Under Transport mode, select FakeTLS.
- Leave FakeTLS domain empty or enter a different domain.
- Click Save.
If FakeTLS domain is empty, it is automatically set to googletagmanager.com. If you use a different domain, make sure it supports HTTPS and TLS 1.3. Enter only the domain name, without https://, a path, or query parameters — for example, deepseek.com.
Port 443 is preferred for FakeTLS. This mode may not work on other ports.
Diagnostics
The proxy diagnostics section is at the bottom of the service's Settings tab. Click the refresh icon next to Diagnostics to display the following information:
- Public port reachable — the proxy is listening on the selected TCP port;
- Telegram upstream reachable — the server can reach a Telegram service endpoint;
- Clients connected — the approximate number of IP addresses with active proxy connections;
- Last config refresh — when the configuration was last updated.
Successful server diagnostics do not guarantee that the proxy is reachable from your network or is not being blocked by your ISP.
Troubleshooting MTProxy and Telemt
If the proxy does not connect:
- Test the proxy separately over Wi-Fi and mobile data.
- Make sure the selected TCP port is not used by another service.
- Install the other proxy service on a different TCP port and compare the results.
For configuration advice, ask in our Telegram community.
If Telemt installation fails with error 202, connect to the server over SSH and run:
sudo nft delete table inet telemt_limit
Telegram WEB Proxy
Unlike a regular MTProxy, Telegram WEB Proxy uses a service web page on your domain. While the proxy is enabled, Telegram opens this page in the background. This can make the connection harder to identify as Telegram traffic.
Opening the domain normally in a browser must display a simple technical page that AmneziaVPN creates automatically. You do not need to build a website or upload an index.html file yourself. Installation requires your own domain or subdomain pointing to the server and an email address. Unlike FakeTLS mode in MTProxy and Telemt, you cannot use a third-party website's domain.
Preparing the Domain
To point the domain or subdomain to the server:
- Purchase a domain from any registrar or use a domain that you already own.
- Choose a neutral name for a dedicated subdomain — an additional address within your domain. We recommend avoiding the words
proxyandtelegramin its name. - Open the website where you manage the domain. This is usually the website of the company where you purchased it. Find DNS, DNS records, or Zone management.
- Create a DNS A record to point the subdomain to your server:
- Type —
A - Name / Host — your chosen subdomain name. If the website asks for the full address, add your domain to it
- Value / IP address — the public IPv4 address of the server where you will install the Telegram proxy
- Type —
- If the record has a Proxy or Proxied switch, turn it off and select DNS only. If there is no such switch, skip this step.
- Save the record. DNS changes may take some time to apply.
Installing Telegram WEB Proxy
Telegram WEB Proxy uses TCP ports 80 and 443. Both ports must be reachable from the internet and must not be used by other services on the server. AmneziaVPN does not let you select different ports for TProxy.
If your hosting control panel has firewall settings, allow incoming TCP connections to ports 80 and 443.
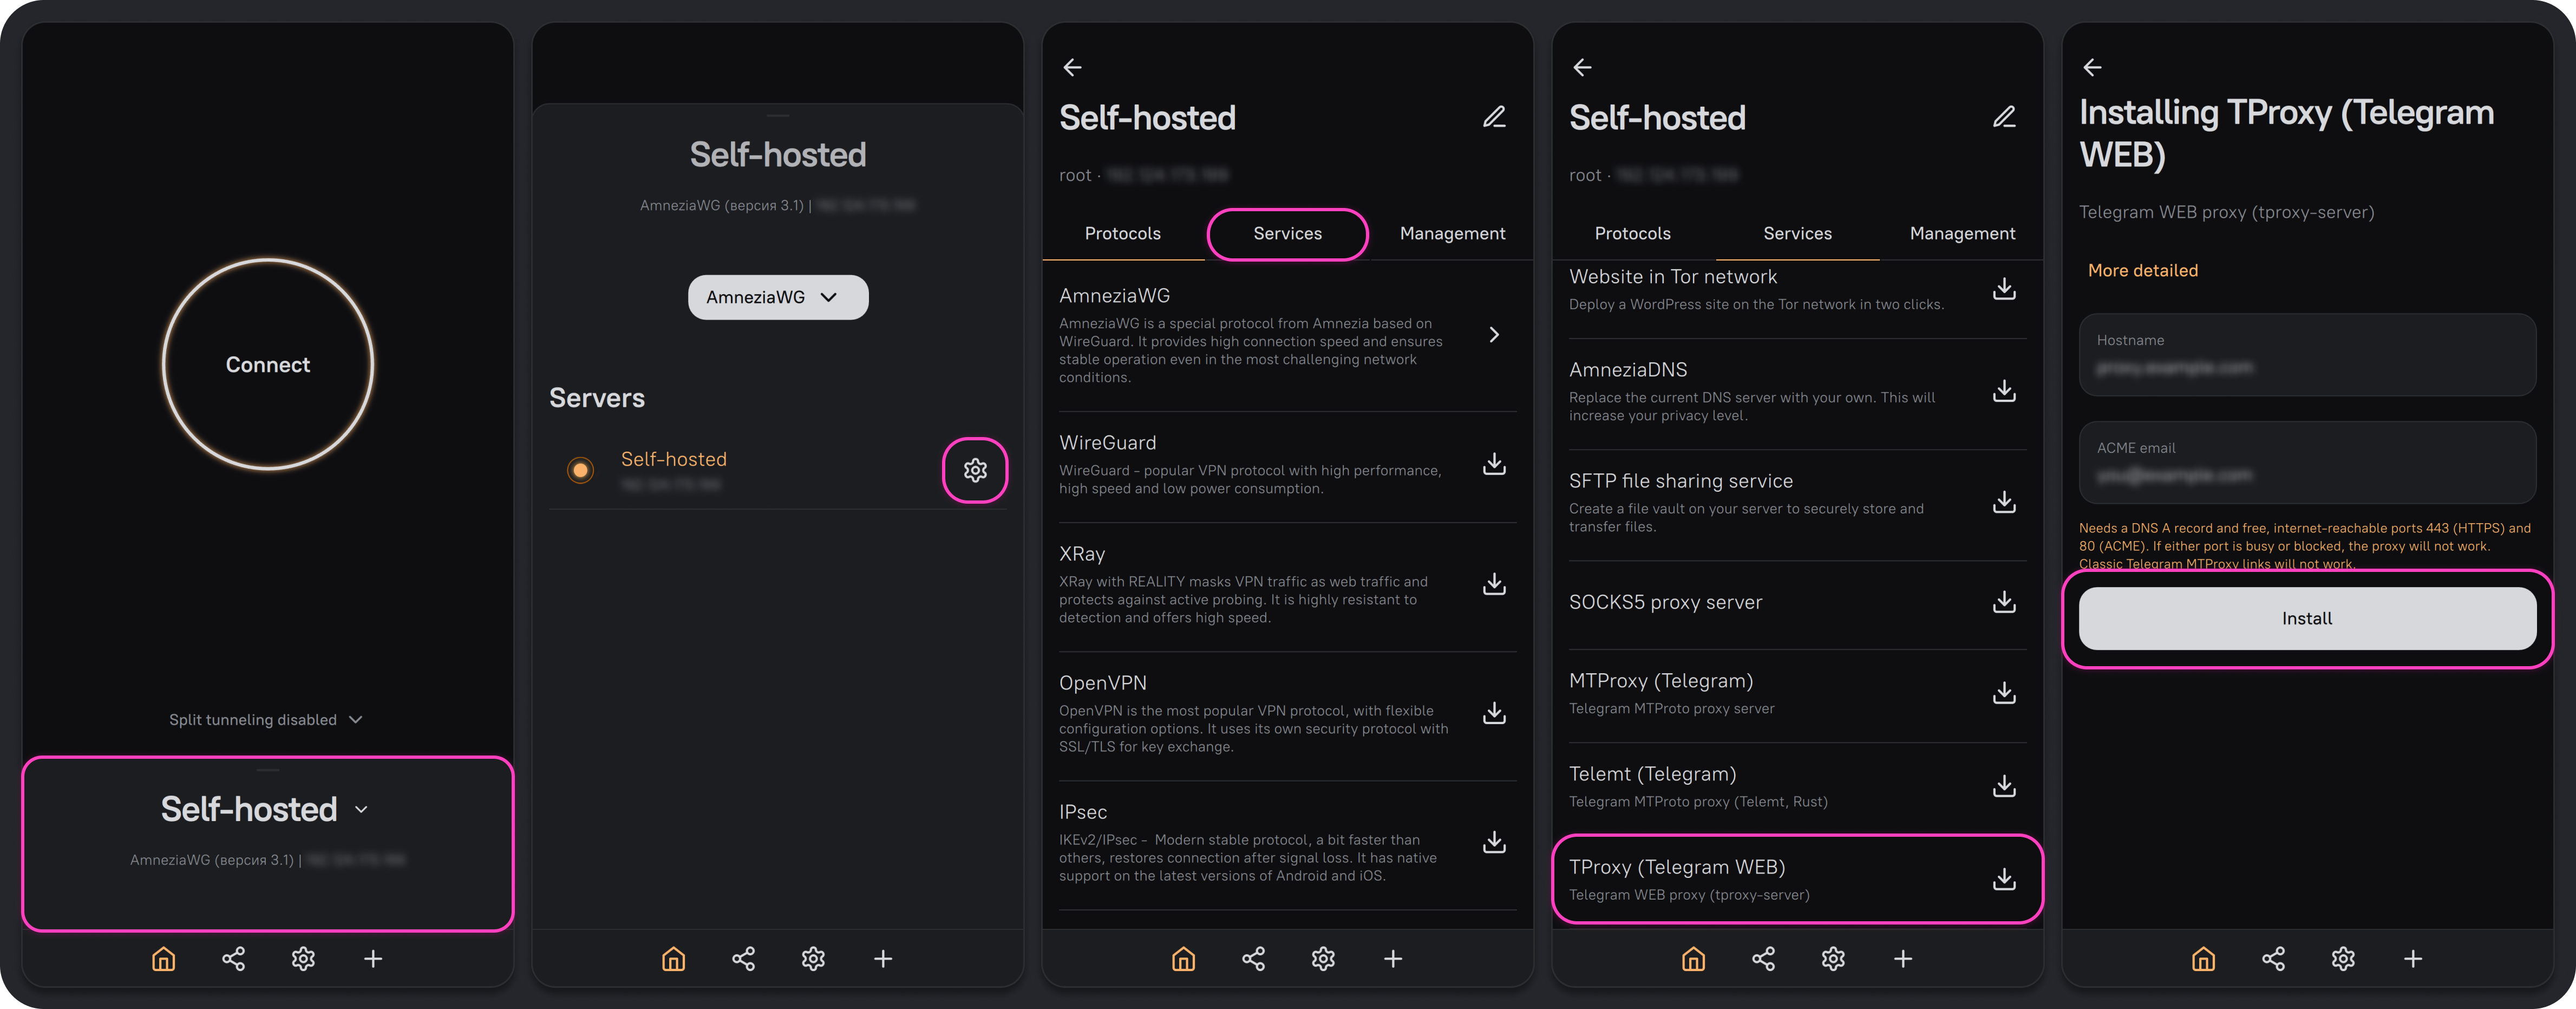
- On the AmneziaVPN main screen, click any connection name.
- Click ⚙️ (gear icon) to the right of the server.
- Open the Services tab.
- Select TProxy (Telegram WEB).
- In Hostname, enter the full address of the subdomain that you created. Do not add
https://, a port number, a slash, or a path. Use only lowercase Latin letters, digits, dots, and hyphens. - In ACME email, enter an email address that you can access. It is required to issue and renew the HTTPS certificate.
- Click Install.
AmneziaVPN creates the secret and web page, requests an HTTPS certificate, and starts the proxy.
Adding a WEB Proxy in Telegram
You can add a WEB Proxy in Telegram in two ways: through a link or manually.
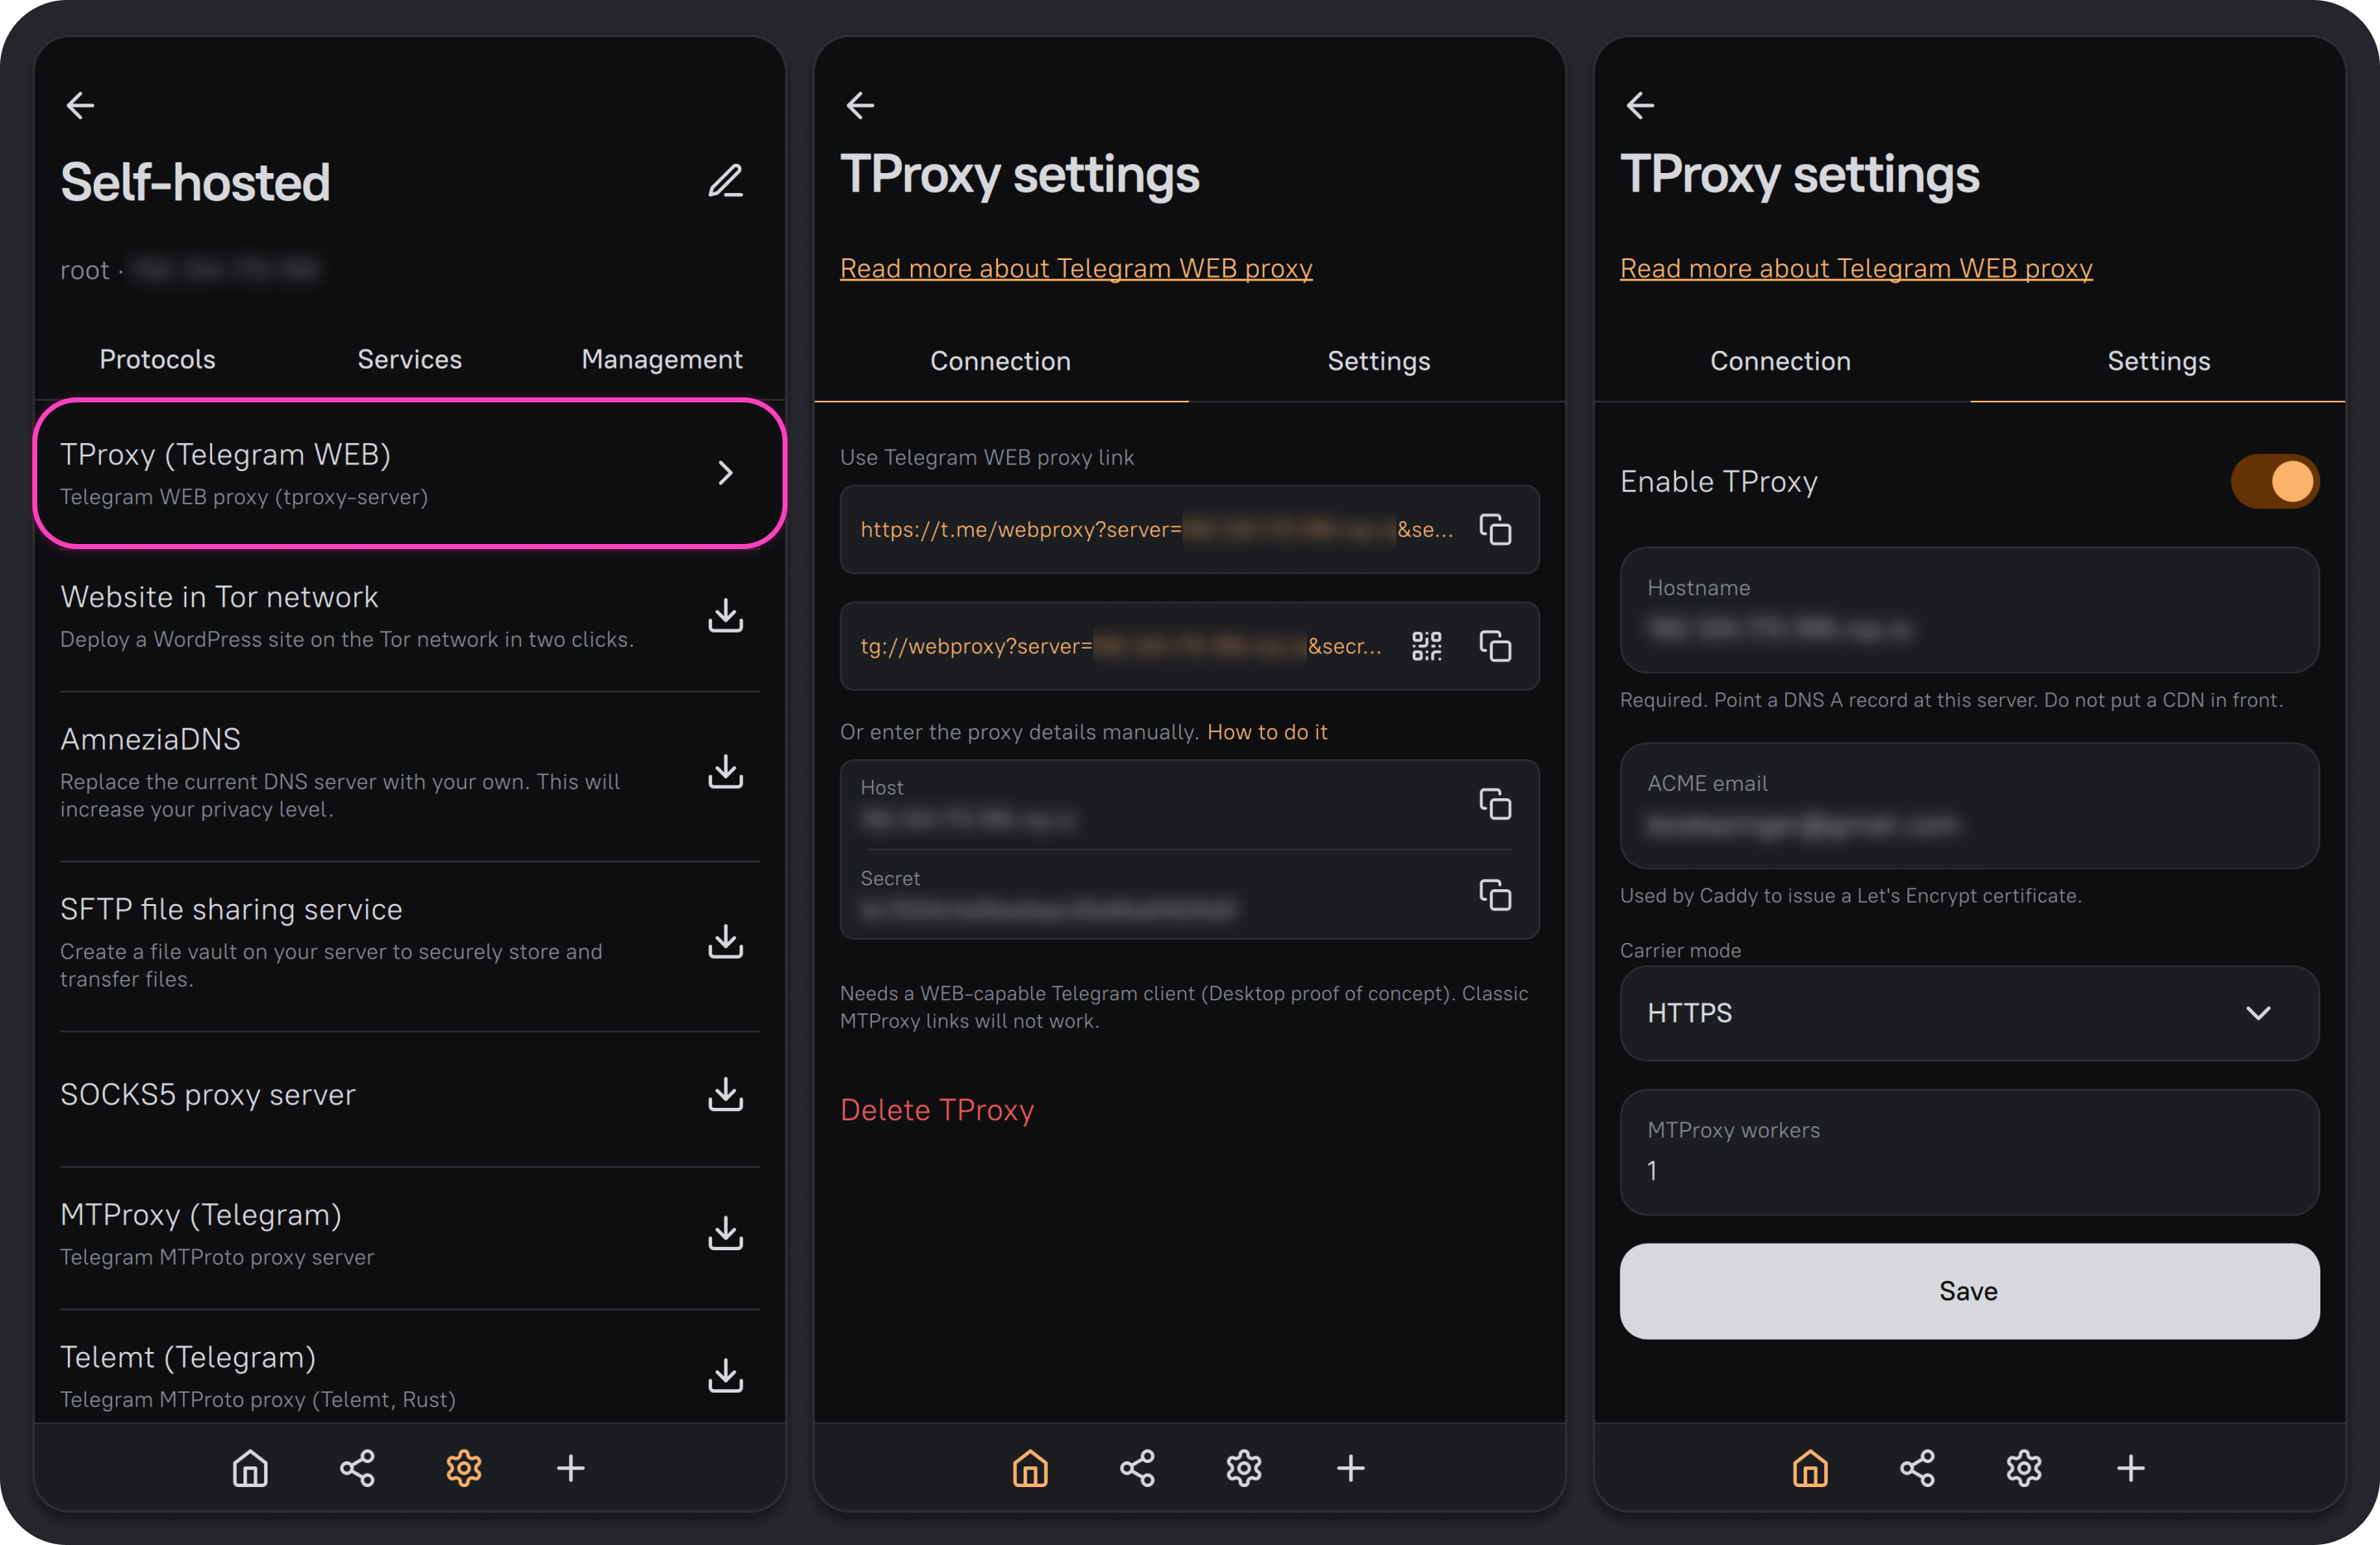
To add the proxy through a link, open the TProxy (Telegram WEB) settings, click the copy icon to the right of the tg://webproxy link, and send it to Saved Messages or another Telegram user. Then click the link in Telegram and confirm adding the proxy.
If nothing happens when you click or tap the tg://webproxy link in Telegram, your current version of Telegram does not support WEB Proxy yet.
To add the proxy manually, open the proxy settings in Telegram, select WEB Proxy, and enter the Host and Secret from the TProxy (Telegram WEB) settings in AmneziaVPN. You do not need to enter a port: Telegram WEB Proxy always uses port 443.
Regular MTProxy links in the tg://proxy format do not work with Telegram WEB Proxy. Do not publish the Secret: it provides access to the proxy.
Telegram WEB Proxy Settings
To open the proxy settings, go to the Services tab in the server settings, select TProxy (Telegram WEB), then open the Settings tab.
If the proxy works, keep the settings applied during installation.
| Setting | Description |
|---|---|
| Enable TProxy | Turns the service on or off. You cannot connect to the proxy while the service is disabled |
| Hostname | The domain or subdomain pointing to the server |
| ACME email | The email address used to issue and renew the HTTPS certificate |
| Carrier mode | How Telegram traffic is carried through the web page. The default is HTTPS |
| MTProxy workers | The number of processes that handle connections. Keep it set to 1 for a regular installation |
Four Carrier mode options are available:
- HTTPS — a shared HTTPS channel for all Telegram connections
- HTTPS lanes — a separate HTTPS channel for each Telegram connection
- WebSocket — a shared WebSocket channel for all Telegram connections
- WebSocket lanes — a separate WebSocket channel for each Telegram connection
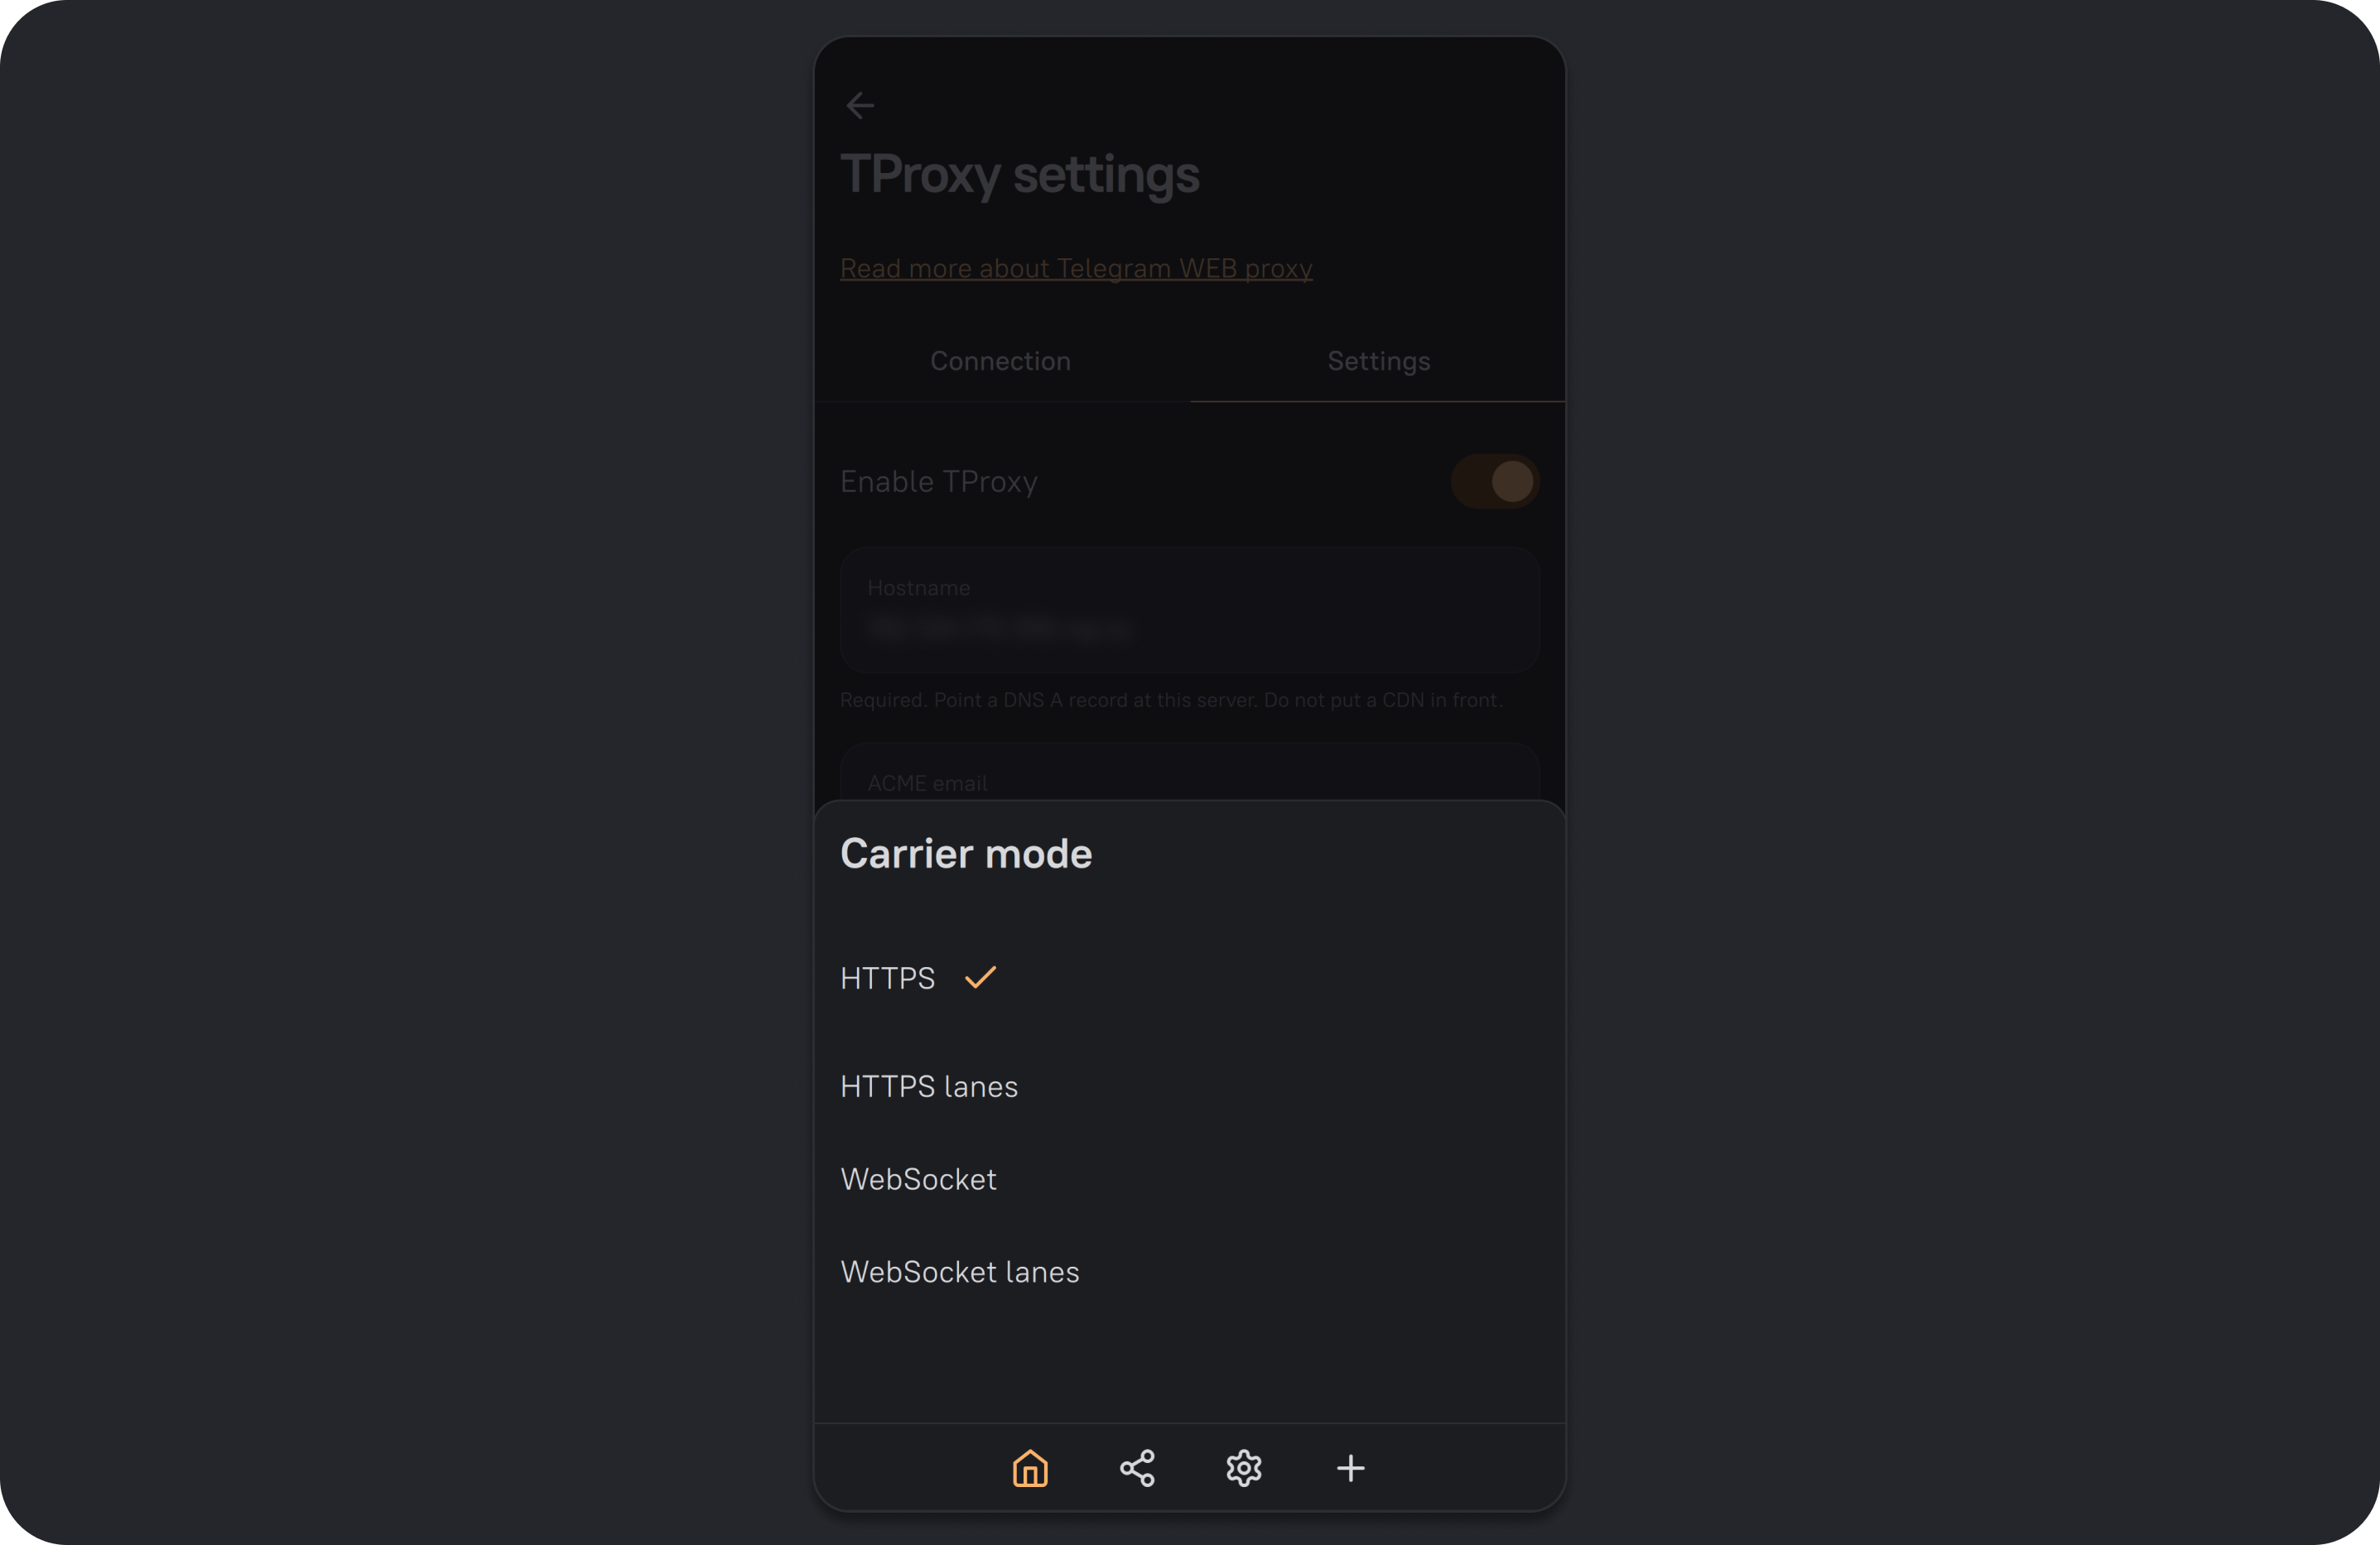
The Carrier mode options do not provide different levels of protection. Change the mode only when troubleshooting or when instructed by support.
Changing Carrier mode does not change the Host or Secret, so you do not need to add the proxy to Telegram again.
Troubleshooting Telegram WEB Proxy
If Telegram WEB Proxy does not connect, open the DNS section on the website where you manage your domain and find the A record for the subdomain entered in Hostname. If Proxy / Proxied is enabled for that record, select DNS only and save the changes. Also make sure TCP ports 80 and 443 are open.
If the web page loads but the proxy does not connect, test it from another network. Proxy availability may depend on ISP restrictions or whether the server's IP address is blocked.